This post is for you if you are looking to install TensorFlow 1.0 from source on ubuntu 14.04 on AWS machine with GPU support(CUDA). Quick Summary of setup:
OS: ubuntu 14.04
Cloud: AWS P2.xlarge instance
TensorFlow version: 1.0.0-rc1
Bazel Version: 0.4.4
CuDNN: 5.1
CUDA: 8.0
Once you have launched an AWS P2.xlarge instance with ubuntu 14.04, follow these instructions to install TensorFlow.
Install TensorFlow 1.0.0 from source:
-
Basic dependencies for TensorFlow:
12345sudo apt-get -y updatesudo apt-get -y upgradesudo apt-get -y install git python-pip python-devsudo apt-get -y install -y libpng12-dev libfreetype6 curl python-numpy python-scipy ipython python-matplotlib build-essential cmake pkg-config libtiff5-dev libjpeg-dev libjasper-dev libgtk2.0-dev libavcodec-dev libavformat-dev libswscale-dev libv4l-dev swig zip python-sklearn python-wheel
2. Bazel Installation:
Bazel is the build tool used by TensorFlow. we are going to use bazel release 0.4.4 for ubuntu.
a) Java Installation: Java is a dependency of Bazel so let’s install that.
(If and only if you are on a VPC, then you have to add your private ip to the host file:
|
1 2 3 4 5 |
vi /etc/hosts //If your private ip is 172.10.101.10 Add this line 127.0.0.1 ip-172-10-101-10 //press escape :wq and get out. |
)
Add the ppa and install Java:
|
1 2 3 4 |
sudo add-apt-repository ppa:webupd8team/java sudo apt-get update sudo apt-get install oracle-java8-installer |
Accept the terms and conditions and Java 8 will be installed.
b) Bazel: We are going to install Bazel. We are going to create a directory installation in home(~) which is /home/ubuntu and download all our installation files there.
|
1 2 3 4 5 6 7 8 9 |
cd ~ mkdir installation cd installation wget https://github.com/bazelbuild/bazel/releases/download/0.4.4/bazel-0.4.4-installer-linux-x86_64.sh chmod +x bazel-0.4.4-installer-linux-x86_64.sh ./bazel-0.4.4-installer-linux-x86_64.sh --user |
Bazel is now installed.
Add the following to your bashrc file:
|
1 2 3 4 5 6 7 |
vi ~/.bashrc //Add following 2 lines at the end and save source /home/ubuntu/.bazel/bin/bazel-complete.bash export PATH="$PATH:$HOME/bin" |
Now, run the .bashrc file to make sure that the changes made start reflecting in current session.
|
1 2 |
source ~/.bashrc |
3. CUDA installation:
|
1 2 3 4 5 6 7 8 9 10 11 |
sudo apt-get install -y linux-image-extra-`uname -r` linux-headers-`uname -r` linux-image-`uname -r` wget http://developer.download.nvidia.com/compute/cuda/repos/ubuntu1404/x86_64/cuda-repo-ubuntu1404_8.0.44-1_amd64.deb sudo dpkg -i cuda-repo-ubuntu1404_8.0.44-1_amd64.deb sudo apt-get -y update sudo apt-get -y upgrade sudo apt-get install -y cuda sudo sh -c "sudo echo '/usr/local/cuda/lib64' > /etc/ld.so.conf.d/cuda.conf" sudo ldconfig |
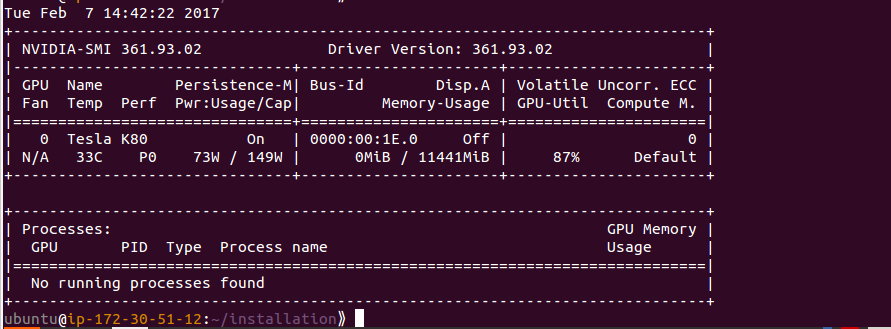
Check whether cuda is installed or not by typing:
|
1 2 |
nvidia-smi |
Output will look like this:
4. Cudnn installation:
You need to go to Nvidia developer site, register there and after answering too many questions, you shall get your hands on Cudnn 5.1 for linux for cuda 8. You need to upload that to your server and follow these steps:
|
1 2 3 4 |
tar -zxf cudnn-8.0-linux-x64-v5.1.tgz sudo cp -P cuda/lib64/* /usr/local/cuda/lib64/ sudo cp cuda/include/* /usr/local/cuda/include/ |
5. Install TensorFlow-1.0:
|
1 2 3 4 5 |
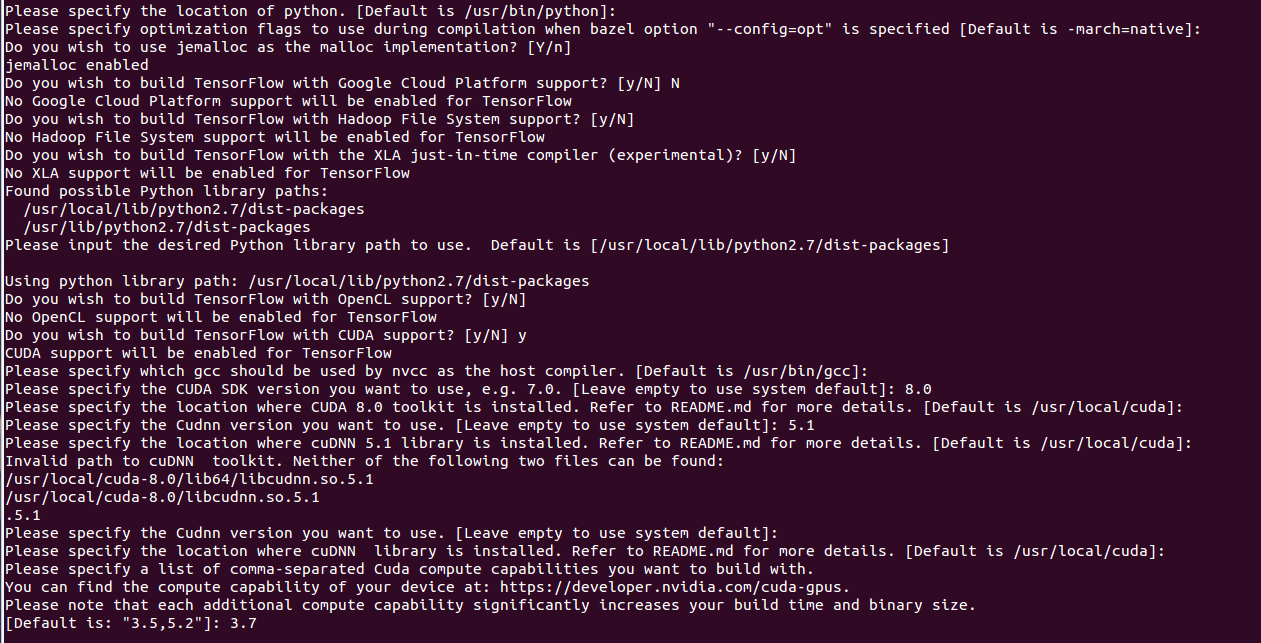
git clone https://github.com/tensorflow/tensorflow git checkout v1.0.0 cd tensorflow ./configure |
Now, it will ask you many questions, answers to most of them is the default option, except for the GPU support, which should be answered as y, for the rest you could simply press Enter key. In the end it shall ask for compute capacity, for which enter 3.7 which is the compute capacity of AWS P2.xlarge instance.

|
1 2 3 4 5 6 7 8 |
bazel build -c opt --config=cuda //tensorflow/tools/pip_package:build_pip_package bazel-bin/tensorflow/tools/pip_package/build_pip_package /tmp/tensorflow_pkg //This created .whl file in /tmp/tensorflow_pkg sudo pip install /tmp/tensorflow_pkg/tensorflow-1.0.0rc1-cp27-none-linux_x86_64.whl |
Add these to your ~/.bashrc file
|
1 2 3 4 |
vi ~/.bashrc export LD_LIBRARY_PATH="$LD_LIBRARY_PATH:/usr/local/cuda/lib64:/usr/local/cuda/extras/CUPTI/lib64" export CUDA_HOME=/usr/local/cuda |
Now, run the .bashrc on command line to make sure that changes just made start reflecting in current session.
|
1 2 |
source ~/.bashrc |
Congratulations! Tensorflow has been installed. In the next step we shall verify the installation.
6. Testing the installation:
a). Testing basic installation and version:
|
1 2 3 4 5 |
python >>>import tensorflow as tf >>>tf.__version__ >>>'1.0.0-rc1' |
If your installation is not correct, you shall get errors and will not be able to print version. But if it prints the version correctly, it means Tensorflow has been installed.
b). Test GPU settings:
Another thing that we need to check is whether CUDA has been installed correctly and we are able to run Tensorflow code on GPU. Let’s run the following code.
|
1 2 3 4 5 6 7 8 |
import tensorflow as tf a=tf.Variable(1.0) b=a+3 with tf.Session() as sess: sess.run(tf.global_variables_initializer()) print(sess.run(b)) |
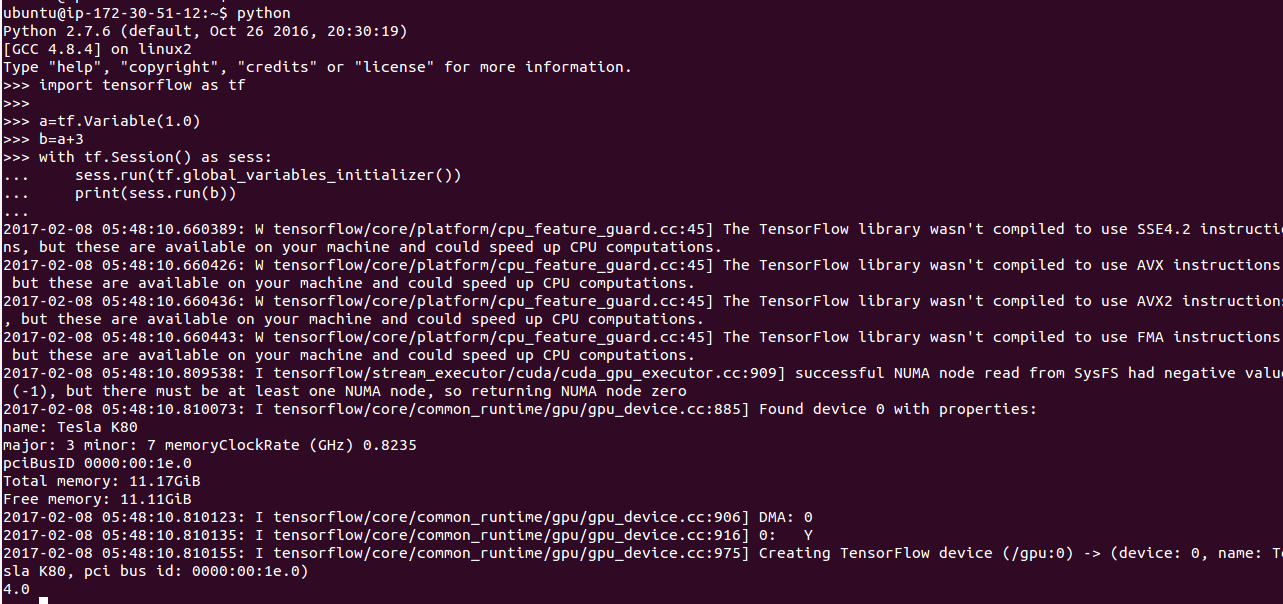
Expected output would mention the device it ran on before it produces output.
|
1 2 3 |
2017-02-07 19:02:59.106875: I tensorflow/core/common_runtime/gpu/gpu_device.cc:975] Creating TensorFlow device (/gpu:0) -> (device: 0, name: Tesla K80, pci bus id: 0000:00:1e.0) 4.0 |
Please note the device it runs on. It should be /gpu:0. If you get /cpu:0 in the output, it means your GPU configuration is wrong.) Because if GPU is available and properly configured then Tensorflow always runs it on GPU first.
See my screenshot:

It’s giving some more instructions on how we can run TensorFlow on CPU faster by using SSE4.2 etc. However, we don’t intend to run TF on CPU. So, we are going to ignore them.
Now, you have a installed Tensorflow-1.0 on AWS server. Follow this quick tutorial to start learning Tensorflow.
Edit: May 9, 2017: Updated the libtiff version to libtiff5-dev from outdated libtiff4-dev.


