Machine learning algorithms are everywhere around you. The recommendations you receive on youtube, estimation of commute time, face detection in google photos, and many more, all of these features that make our lives easier would not have been possible without advances in machine learning algorithms.
Machine learning can be further classified into various fields; many of these have profound implications on our daily life. One up-and-coming field in Machine learning is object detection.
Object detection
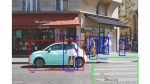
The task assigned to an object detection algorithm is pretty straightforward to understand for humans. It is tasked to detect all objects from a given image. Formally, Object detection is a computer vision technique that allows us to identify and locate objects in an image or video. With this kind of identification and localization, object detection can be used to count objects in a scene and determine and track their precise locations while accurately labeling them.
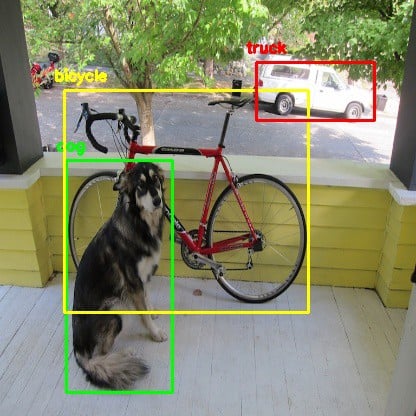
Source: https://github.com/pjreddie/darknet/blob/master/data/dog.jpg
The current state of the art is the EfficientDet7 network which achieves nearly 55.1% average precision on the Microsoft COCO dataset. It is much more efficient than its predecessors in terms of inference time as well as accuracy.
Applications of object detection algorithms are widespread. Object detection can be used in places such as security systems, autonomous vehicles, and medical image analysis, only to name a few. Object detection appears to be a trivial task to humans but it is pretty tricky for a machine to classify objects from an image frame. This is where the TensorFlow object detection API comes into play.
What is an API?
Before we dive right into training computer vision algorithms and tune the parameters, we first need to understand what an API is. The full form of API is application programming interface. It is the software intermediary which allows two separate applications to communicate with each other. The first impression of this definition to someone who is new to programming might be daunting. Simply put, API allows two parts of a program to exchange information.
Let’s understand this by a simple example.
Say you go to a restaurant and you wish to order a delicious pizza. You go to the restaurant and sit down. A waiter comes to take your order, and you order your favorite pizza. Now, you wait for some time until the pizza is being prepared. Once your order is ready, the waiter gets your order from the kitchen and serves it to you.
In this scenario, you do not require to know how a pizza is made. You just had to ask the waiter, and he asked the staff inside the kitchen to make a pizza for you. One can compare this to how a simple API request works.
Say you are application 1, and the kitchen is application 2. You wish to request something from the kitchen, but you do not need to know how it prepares the pizza. The waiter, who is the communication medium between you and the kitchen, plays the API’s role. He is connecting you with the kitchen staff so you can have your request fulfilled.
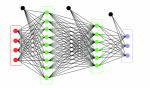
Tasks like Object detection involve a fair amount of matrix algebra, calculus, and probability, so we use TensorFlow to do all the heavy lifting for us. TensorFlow is a popular framework developed by Google mind, and it was open-sourced in the year 2015. Since then, the Github repository has accumulated more than 150k stars. Frameworks allow us to focus on the more important issues at hand rather than breaking our heads over complex mathematical problems. It also prevents rebuilding the wheel by providing many useful helper functions and classes.
What is TF Obj Det API?
The TensorFlow API is an easy-to-use interface that wraps around various pre-trained models’ core object detection functionality. This API makes it easy for us to create, train and run inference on multiple models. You can also use any of the pre-trained networks listed in the TF2 Zoo. I have discussed various models within the TF2 Zoo in the following section. This will allow you to correctly identify the model you should be using according to your needs. The easiest way to get started is by running your code in the cloud on a CoLab notebook. The Colab environment comes with most of the dependencies preloaded, so it won’t take a lot of time to get started.
The first thing you need to do is to install the object detection API in your colab environment. One thing to note about this environment is that your session is stored only for some time after you close your browser tab. Once you are disconnected from your session, the notebook is recycled, and every time you need to work on that notebook, you need to perform each step involved in downloading the API.
Models in TF2 ZOO
Inference time of a model is the time taken by the program to run inference on a single training example using that particular model. Apart from hardware performance, Inference time also depends on the number of matrix manipulations and multiplications involved in running inference using the model. Clearly, when the input size increases, the number of pixels involved in an image also increases which eventually leads to an increase in the number of calculations. Hence, we can say that for similar model architectures, increasing the input size also increases its inference time.
Algorithms also use different backbones for object detection which significantly affects the mAP score. Before beginning to use a certain algorithm, you must be familiar with the backbone being utilized so that you can judge whether they satisfy your use case or not.
In case inference time is your priority, then you should use the faster R-CNN algorithm or use the mobilenet architecture coupled with a lower input size. On the other size, if you wish to generate more accurate predictions, you should try to use a larger input size
- Centernet: Frames object detection slightly different as compared to traditional anchor-free object detection approaches. This model predicts a triplet of points on the image to find an image. Traditionally, models used a pair of key points to detect an object within an image.
- EfficientDet: This algorithm uses the novel efficient net architecture as its backbone which makes it robust and fast. The outputs of each layer within the effnet are fed into a bi-directional feature network which then outputs classes and bounding boxes.
- SSD: Single shot detection means that each object in the image is located and marked in only a single forward pass of the neural network. This greatly reduces the inference time because we are reducing the number of matrix multiplication operations.
- Faster R-CNN: This algorithm is blazing fast as compared to its predecessors. This uses a region proposal network to generate predictions in contrast to selective search in fast R-CNN. However, one important thing to note is that this algorithm requires several passes of the image through the CNN to make accurate predictions.
Getting started with the API
We will be working in the Colab environment, so we do not need to break our heads over installing dependencies. We will be using protobufs to compile binaries within the TensorFlow object detection API module. Protobufs are a language-neutral way to describe information. In other words, you may write a protobuf only once, and then you can compile it as required to use with Python, Java, or any different language.
|
1 2 3 4 5 6 7 8 9 10 11 12 13 14 |
# Gets models from TF2 Zoo $ git clone https://github.com/tensorflow/models.git # Compile protobufs using protoc command $ cd ./models/research/ $ protoc object_detection/protos/*.proto --python_out=. # Install TensorFlow Object Detection API. $ cp object_detection/packages/tf2/setup.py . $ python -m pip install . # Run the model builder test $ python /content/models/research/object_detection/builders/model_builder_tf2_test.py |
Selection of Data
To feed data into our model, we will be supplying data in the tfrecords format. Simply put, tfrecord is a binary storage format optimized to be used with TensorFlow. You may choose any dataset upon which you wish to train your model. You must make sure that the data is available in tfrecords format so the API can use it. I will be using a custom dataset on Kaggle, which has already been converted to tfrecords.
Why use Tf-records?
A tf records file stores binary data in a sequenced structure. Conversion to tfrecords initially may be a tough task because the task of learning a new file format for deep learning might seem daunting to a few.
However, converting data from images to tfrecords is beneficial for many reasons. We can preprocess the data before saving it as tfrecords. This enables us to use the data later on by simply reading the tfrecords file and saves us from the headache of normalizing data all over again. Since we are processing the data before saving it as tfrecords, this also provides us with the flexibility to combine multiple datasets with ease. For example, 2 datasets might use slightly different notations for their bounding boxes. We can change this using preprocessing and saving data uniformly.
TFRecord file format is optimized to be used with tensorflow. An optimized data feeding pipeline enables quicker training and testing of various models.
I am using the kangaroo dataset available on Kaggle. In this dataset, we will be using only 1 class for detection, which is the kangaroo class, for the sake of simplicity. We will specify this in a labelmap.pbtxt file and upload it to our colab session so that the script to convert the dataset to tfrecord format can identify the number of classes.


|
1 2 3 4 5 6 7 8 9 10 11 12 13 14 15 |
Downloading dataset from kaggle pip install -q kaggle pip install -q kaggle-cli # Set your username and API tokens as environment variables KAGGLE_USERNAME=‘username’ KAGGLE_KEY=‘api-token’ # Creating folder for dataset and downloading mkdir ./dataset cd ./dataset kaggle datasets download -d hugozanini1/kangaroodataset --unzip |
Now, we convert the dataset to tfrecords using the generate_tfrecords script provided by the dataset author. We can get this script by downloading it from GitHub.
|
1 2 3 4 5 6 7 8 9 |
# Download the script to generate TFRecords from dataset cd /content/ wget https://raw.githubusercontent.com/hugozanini/object-detection/master/generate_tf_record.py # Convert to tfrecords python generate_tf_record.py -l labelmap.txt -o dataset/train.record -i dataset/images -csv dataset/train_labels.csv python generate_tf_record.py -l labelmap.txt -o dataset/test.record -i dataset/images -csv dataset/test_labels.csv |
Let us now understand what this generate_tf_Record.py script is doing behind the scenes. One must understand how the script works so that you can create your script for custom datasets in the future. This link hosts the raw conversion python script. I will be focusing on the critical components of the script in the next section. One important thing to consider is that here the dataset provides us with a CSV file. The CSV file contains the filename, xmin, ymin, xmax, ymax, and class name for a given image. We have numerous records with the same values in the file name column when we have multiple bounding boxes.
Class TFRecord – This is just a class that encapsulates all the logic required to convert data into tfrecords. It is generally good practice to encapsulate functions so that your code becomes easier to maintain and understand.
Function split – As discussed earlier, one may have multiple bounding boxes in an image, and in that case, we have numerous records with the same filename in the CSV file. This function groups together all such records and returns a named tuple with attributes filename and the pandas group.
Function create_tf – This is the most crucial function responsible for generating the individual tfrecord for an image.
These lines reads the image from memory
|
1 2 3 4 5 6 |
with tf.io.gfile.GFile(os.path.join(path, '{}'format(group.filename)), 'rb') as fid: encoded_jpg = fid.read() encoded_jpg_io = io.BytesIO(encoded_jpg) image = Image.open(encoded_jpg_io) width, height = image.size |
These lines insert values of coordinates and class labels into empty lists. One important thing to note here is that the coordinates range from 0-1 since we are dividing the coordinates by width and height accordingly.
|
1 2 3 4 5 6 7 8 |
for index, row in group.object.iterrows(): xmins.append(row['xmin'] / width) xmaxs.append(row['xmax'] / width) ymins.append(row['ymin'] / height) ymaxs.append(row['ymax'] / height) classes_text.append(row['class'].encode('utf8')) classes.append(self.class_text_to_int(row['class'])) |
This is a simple constructor call to the tf.train.Example class. We create a feature dict which is fed into the constructor so all our records have the same structure. Finally, the serializeToString function provided within the tf.train.Example class can be used to serialize the tfrecord data.
|
1 2 3 4 5 6 7 8 9 10 11 12 13 14 15 16 |
tf_sample = tf.train.Example(features=tf.train.Features(feature={ 'image/height': dataset_util.int64_feature(height), 'image/width': dataset_util.int64_feature(width), 'image/filename': dataset_util.bytes_feature(filename), 'image/source_id': dataset_util.bytes_feature(filename), 'image/encoded': dataset_util.bytes_feature(encoded_jpg), 'image/format': dataset_util.bytes_feature(image_format), 'image/object/bbox/xmin': dataset_util.float_list_feature(xmins), 'image/object/bbox/xmax': dataset_util.float_list_feature(xmaxs), 'image/object/bbox/ymin': dataset_util.float_list_feature(ymins), 'image/object/bbox/ymax': dataset_util.float_list_feature(ymaxs), 'image/object/class/text': dataset_util.bytes_list_feature(classes_text), 'image/object/class/label': dataset_util.int64_list_feature(classes), })) return tf_sample |
Function generate – This function puts together all the logic discussed so far and writes records to our specified output file. Workflow for this function is as follows –
- Instantiates necessary objects to begin writing records.
- Creates groups by calling the function split on the data frame.
- Iterates over each group, calls the create_tf function, which returns a tf.Train.Example instance.
- Writes to the output file on each iteration using the tfRecordWriter instance instantiated at the beginning of the function call.
|
1 2 3 4 5 6 7 8 9 10 11 12 13 14 15 |
def generate(self, output_path, image_dir, csv_input) -> None: writer = tf.io.TFRecordWriter(output_path) path = os.path.join(image_dir) data = pd.read_csv(csv_input) grouped = self.split(data, 'filename') for group in grouped: try: tf_sample = self.create_tf(group, path) writer.write(tf_sample.SerializeToString()) except: continue logging.info('Successfully created the TFRecords: {}'.format(output_path)) |
Choosing Model Architecture
Similar to the dataset, you can use any model which you wish to train. For this exercise, I am using an SSD mobilenet v2 320*320 model.
|
1 2 3 4 5 6 7 8 9 10 |
# Download model cd %ROOT_DIR% wget http://download.tensorflow.org/models/object_detection/classification/tf2/20200710/mobilenet_v2.tar.gz tar -xvf mobilenet_v2.tar.gz rm mobilenet_v2.tar.gz # Get configuration files for the model before training wget https://raw.githubusercontent.com/tensorflow/models/master/research/object_detection/configs/tf2/ssd_mobilenet_v2_320x320_coco17_tpu-8.config mv ssd_mobilenet_v2_320x320_coco17_tpu-8.config mobilenet_v2.config |
Start Training
Before training the model, we need to set up a few hyperparameters and the configuration file for the API to use. In the below code cells, I have used the hyperparameters as suggested by the mobilenet paper authors. Still, you can also experiment with those and finetune to get the best possible model.
The final config file has several parameters out of which a few are discussed below:
|
1 2 3 |
fine_tune_checkpoint: "/content/mobilenet_v2/mobilenet_v2.ckpt-1" fine_tune_checkpoint_type: "classification" |
These parameters tell the API that we are finetuning our model, and it should load the model weights saved at the fine_tune_checkpoint path.
|
1 2 |
optimizer |
This parameter is responsible for providing parameters required by an optimizer to run gradient descents. It supplies values like learning rate, warmup learning rate, and so on.
|
1 2 |
Image_resizer |
This fixes the size of input images to the network.
All other necessary parameters which are not included or need to be overridden are specified below. These are then written to the config file before training.
|
1 2 3 4 5 6 7 8 9 10 11 12 13 14 15 |
# Define paths to necessary directories num_classes = 1 batch_size = 96 num_steps = 7500 num_eval_steps = 1000 train_record_path = './dataset/train.record' test_record_path = './dataset/test.record' model_dir = './training/' labelmap_path = './labelmap.pbtxt' pipeline_config_path = 'mobilenet_v2.config' fine_tune_checkpoint = '.mobilenet_v2/mobilenet_v2.ckpt-1' |
Edit pre-existing config file to perform transfer learning on the custom dataset
|
1 2 3 4 5 6 7 8 9 10 11 12 13 14 15 16 17 18 19 20 21 22 23 24 25 26 27 28 29 30 31 32 33 34 35 36 37 |
import re with open(pipeline_config_path) as f: config = f.read() with open(pipeline_config_path, 'w') as f: # Set labelmap path config = re.sub('label_map_path: ".*?"', 'label_map_path: "{}"'.format(labelmap_path), config) # Set fine_tune_checkpoint path config = re.sub('fine_tune_checkpoint: ".*?"', 'fine_tune_checkpoint: "{}"'.format(fine_tune_checkpoint), config) # Set train tf-record file path config = re.sub('(input_path: ".*?)(PATH_TO_BE_CONFIGURED/train)(.*?")', 'input_path: "{}"'.format(train_record_path), config) # Set test tf-record file path config = re.sub('(input_path: ".*?)(PATH_TO_BE_CONFIGURED/val)(.*?")', 'input_path: "{}"'.format(test_record_path), config) # Set number of classes. config = re.sub('num_classes: [0-9]+', 'num_classes: {}'.format(num_classes), config) # Set batch size config = re.sub('batch_size: [0-9]+', 'batch_size: {}'.format(batch_size), config) # Set training steps config = re.sub('num_steps: [0-9]+', 'num_steps: {}'.format(num_steps), config) f.write(config) |
Start training using the following command:
|
1 2 3 4 5 6 7 8 |
python ./models/research/object_detection/model_main_tf2.py \ --pipeline_config_path={pipeline_config_path} \ --model_dir={model_dir} \ --alsologtostderr \ --num_train_steps={num_steps} \ --sample_1_of_n_eval_examples=1 \ --num_eval_steps={num_eval_steps} |
Check Model metrics
After training, we need to check our trained model’s metrics to get an insight as to whether the model is performing well on unseen data or not.
To evaluate the trained model, run the following script:
|
1 2 3 4 5 |
!python ./models/research/object_detection/model_main_tf2.py \ --pipeline_config_path={pipeline_config_path} \ --model_dir={model_dir} \ --checkpoint_dir={model_dir} |
This line returns values of metrics such as precision, recall, and IoU for unseen data.
To visualize metrics on tensorboard, you can run:
|
1 2 3 |
load_ext tensorboard tensorboard --logdir '/content/training/' |
Running Inference:
|
1 2 3 4 5 6 7 8 9 10 11 12 13 14 15 16 |
image_np = load_image_into_numpy_array('dataset/images/kangaroo-108.jpg') output_dict = run_inference_for_single_image(model, image_np) vis_util.visualize_boxes_and_labels_on_image_array( image_np, output_dict['detection_boxes'], output_dict['detection_classes'], output_dict['detection_scores'], category_index, instance_masks=output_dict.get('detection_masks_reframed', None), use_normalized_coordinates=True, line_thickness=25) display(Image.fromarray(image_np)) |