In this blog post, we will look into how to use multiple gpus with Pytorch. We will see how to do inference on multiple gpus using DataParallel and DistributedDataParallel models of pytorch. Same methods can also be used for multi-gpu training. Pytorch provides a very convenient to use and easy to understand api for deploying/training models on more than one gpus. So the aim of this blog is to get an understanding of the api and use it to do inference on multiple gpus concurrently.
Before we delve into the details, lets first see the advantages of using multiple gpus.
- During training, we can have larger batch size. And it normally follows a linear pattern. So if we can fit a batch size of b in one gpu, then we will be able to use a batch size of bXn with n number of gpus. Larger batch size allows us to use larger learning rate and therefore we can train the network in lesser amount of time.
- Larger batch size has other advantages too. Typically, we can take care of lesser batch size with lesser learning rate in order to make the network converge. That is not the case with new and upcoming applications of deep learning like neural architecuture search, self supervised learning etc. In these types of training, we require a humungous batch size. And therefore using multiple gpus becomes the necessity.
- We can have higher throughput during the inference. So if we are able to run a video inference at f fps, then we will be able run the inference at fXn fps
The aim of the following blog post is to set the premise by introducing single gpu inference example. This is going to serve as a reference for future blog post series which will cover multi-gpu usage. We will also cover some common error cases and their fixes. In doing so, we will look into different ways of doing similar things which comes in handy while understanding someone else’s code.
Contents are:
- Toy model building
- Pushing model into gpu
- Input and forward propagation
- Types of parallelism
- DataParallel model of Pytorch
Toy model
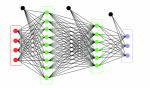
First of all lets have a very basic toy model which we are going to use througout the blog. We are going to have a simple two layer fully connected model as follows
|
1 2 3 4 5 6 7 8 9 10 11 12 13 14 |
import torch import torch.nn as nn class Model(nn.Module): def __init__(self, input_channels, output_channels): super(Model, self).__init__() self.fc1 = nn.Linear(input_channels, output_channels) self.fc2 = nn.Linear(output_channels, output_channels) def forward(self, input): output1 = self.fc1(input) output2 = self.fc2(output1) print("i am inside the model on gpu", input.get_device(),"input size", input.size(),"output size", output2.size(),"output is on gpu",output2.get_device()) return output2 |
- Line 3 is class name of the network
- Inside constructor(line 4), we are instantiating a simple two linear layers model(fully connected)
- Line 9 starts the forward definition. When we pass the input to this model, this is the part where forward propagation happens
- On line 12, we are printing the device or gpu on which input resides. Input and output sizes are also printed
Now lets make a sample network from the model
|
1 2 |
model = Model(32,64) |
- We have made a model that takes in 32 channels input and produces an output with 64 channels
This concludes our model building part.
Pushing model into gpu
The model that we have built is residing on cpu right now. Lets push it to gpu through the following code.
|
1 2 |
model.cuda() ##This puts the model in gpu 0 |
- Important point here is that, when gpu id is not mentioned inside the function cuda(), model is put into the default gpu
Input and forward propagation
Now we need a sample input for inferencing.
|
1 2 3 4 |
x = torch.rand(3,32) x = x.cuda() ###This puts the input into default gpu ie. 0 y = model(x) |
- First we prepare a random input of shape (3, 32) where 3 is the batch size and 32 is number of channels. It is created on cpu
- Then we need to put x into cuda. Mismatch between the device of input and model is not allowed. We will see this in more detail later.
- Then we forward the input with model to get the output
The program gives the output:
|
1 2 |
i am inside the model on gpu 0 input size torch.Size([3, 32]) output size torch.Size([3, 64]) output is on gpu 0 |
So we can see that both the input and output are residing on the gpu 0
But what if input is not on the same gpu as the model?
So lets take an example where we have the model on gpu 1 and input is on gpu 0. The code is as follows:
|
1 2 3 4 5 6 7 8 |
model = Model(32,64) model.cuda(1) ###This puts the model on gpu 1 x = torch.rand(3,32) x = x.cuda() ###input is in gpu 0 y = model(x) ###This will not work because of mismatch between device of input and model |
When we run the above snippet, it crashes saying “arguments are located on different GPUs”.
So lets make the changes to rectify the problem
|
1 2 3 4 5 6 7 8 9 10 11 12 13 14 |
model = Model(32,64) model.cuda(1) ###This puts the model on gpu 1 x = torch.rand(3,32) x = x.cuda() ###input is in gpu 0 #y = model(x) ###This will not work because of mismatch between device of input and model y = model(x.cuda(1)) y = model(x.to(1)) ##Same with different syntax y = model(x.to(torch.device("cuda:1"))) ##Same with different syntax torch.cuda.set_device(1) ##Setting default gpu to 1 y = model(x.cuda()) |
- The solution is basically putting the input into the same device as the model
- Lines 9, 10, and 11 illustrates different syntax to do so
- Line 13 sets the default cuda device to 1. After that x.cuda() works as it is because it will put the tensor in gpu 1 now
Uptill now we have covered a very simple single gpu usage. Now lets see how to run the model using multiple gpus.
Types of Parallelism
Running/training model on multiple gpus is categorized into two types.
- Data Parallel : In this, the whole model is replicated in all the gpus with all the parameters of the model residing in each of the gpu. As the name suggests, parallelism is done on the data. This means that the data is split along the batch and sent to different gpus. So each model sitting on a gpu gets its own share of data.
- Model Parallel: In this, model itself is partitioned and different chunks/Layers/Parameters are sent to different gpus. This type of parallelism becomes essential when model size is huge and it cannot be fit into a single gpu.
Usage of model parallelism is pretty straight-forward in pytorch and can be achieved by tweaking things that we covered in first part of the section.
For the data parallelism, pytorch provides a wrapper DataParallel on top of the model that partitions the data internally and assigns it to different gpu. This is what is normally adopted for training the networks like resnet, inception, mobilenet etc on imagenet nowadays using more than one gpus. That allows one to use larger batch size and achieve faster training.
Lets look at our previous example and run it on two gpus with device ids 1 and 3 using DataParallel.
|
1 2 3 4 5 6 7 8 9 10 11 12 13 14 15 16 |
import torch import torch.nn as nn class Model(nn.Module): def __init__(self, input_channels, output_channels): super(Model, self).__init__() self.fc1 = nn.Linear(input_channels, output_channels) self.fc2 = nn.Linear(output_channels, output_channels) def forward(self, input): output1 = self.fc1(input) output2 = self.fc2(output1) return output2 device_ids = [1,3] model = Model(32,64) model = torch.nn.DataParallel(model, device_ids = device_ids) model.cuda(device_ids[0]) ##or model.to(device_ids[0]) or model.to(torch.device()) |
- In line 13, we have defined the gpus to be used
- In line 14, we instantiate the model
- In line 15, we wrap the model using DataParallel functionality of pytorch and mention the device ids where the model replica will be made. Note: If device_ids are not mentioned, it automatically puts the model in all the gpus available.
- In line 16, we push the model to gpus. Note: The device id that need to be mentioned here should belong to the first device from device_ids. That becomes the parent id for the model
With the above code, we have put the model onto two gpus. Now lets pass the input to the model. This is where the beauty lies. We do not have to write anything to partition the data and our DataParallel takes care of it automatically.
|
1 2 3 4 |
x_cpu = torch.rand(3,32) ##This is in cpu x_cuda3 = x_cpu.cuda(device_ids[0]) ###input is in gpu 1 y1 = model(x_cuda3) print("final y1 is in gpu ", y1.get_device()) |
- Here we have first made a tensor on cpu with 3 batch size
- Then on line 2, we make a copy of that tensor on gpu 1
- On line 3, we forward the cuda tensor into the model
- Then we print the device id for the final output tensor
We get the output as show below
|
1 2 |
final y1 is in gpu 1 |
So we started with the tensor that was on gpu 1 and we get an output that is also on gpu 1. But how do we know that pytorch has used both the gpus 1 and 3 for inference ?
In order to see that, we can put the print statement inside the forward function as below.
|
1 2 3 4 5 6 7 |
def forward(self, input): output1 = self.fc1(input) output2 = self.fc2(output1) print("i am inside the model on gpu", input.get_device(),"input size", input.size(),"output size", output2.size(),"output is on gpu",output2.get_device()) return output2 |
With the above change, lets run the code again. The output that we get now is
|
1 2 3 4 |
i am inside the model on gpu 1 input size torch.Size([2, 32]) output size torch.Size([2, 64]) output is on gpu 1 i am inside the model on gpu 3 input size torch.Size([1, 32]) output size torch.Size([1, 64]) output is on gpu 3 final y1 is in gpu 1 |
So we can see that the two sets of prints are shown(one for each gpu). We had 3 batch size in the input and so pytorch has put 2 elements into gpu 1 and one element into gpu 3. So basically the input which was in gpu 1 was partitioned internally and passed to the two gpus and final output was collected into gpu 1(the parent device of the model).
An important thing to note here is that the input tensor need not be in gpu 1. It can be residing anywhere and irrespective of its device id, pytorch DataParallel internally distributes data to different gpus and merges the output into the parent id of the model. For example in the code below, we are forwarding the tensor sitting on cpu. And we still get the same output as before
|
1 2 3 4 |
x_cpu = torch.rand(3,32) ##This is in cpu y2 = model(x_cpu) print("final y2 is in gpu", y2.get_device()) |
This concludes our section on using multiple gpus in pytorch through DataParallel model.