Motivation behind this post:
Opencv object detectors which are built using Haar feature-based cascade classifiers is at least a decade old. OpenCV framework provides a default pre-built haar and lbp based cascade classifiers for face and eye detection which are very good quality detectors. However, I had never measured the accuracy of these face and eye detectors.
I recently discovered that pre-built haar/lbp cascades have a relatively higher false positive rates which might make them unsuitable for many use-cases. It’s possible to build an eye detector with very high accuracy and low false positive rates for many cases with OpenCV.
Of-course, for building more general object detectors I recommend using GPU and deep learning. You can learn more about it in my previous post here. In this post, I shall describe how my team trained a near perfect Haar based eye-detector for one of Silicon valley based client. I shall also provide code and the steps to train a Haar based object detector.
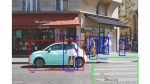
Example performance:
Sample image and our eye detector.

Problem and challenge:
Our valley based client works with human eyes and needed an object detection system that can be integrated into their existing system and can detect human eyes with very high accuracy and low false positive rates. They were working with OpenCV based eye detector that uses Haar feature-based cascade classifiers for a year which was around 89% accurate on their images. However they were not able to reduce the false positive rates. Handling 11% error rate manually was causing them a lot of distress and was breaking work flows. They were looking for accuracy higher than 95% for their system to work smoothly. Also, object detection time must be less than 20 ms. Although their images were relatively easy, yet restriction of using OpenCV made it challenging.
Solution: My first instinct is always to advise a Deep learning based solution to any computer vision problem as it’s more accurate. But, as their system didn’t have GPUs available and they wanted to perform detection within 20 ms we had no other option but to improve the existing Haar or LBP(LBP is much faster than Haar) based eye detector. Here are how we did it:
i) Collection of Training data: We got around 1000 images of human eyes collected using our data team. We collected around 7000 negative images randomly from the internet.
ii) Initial Training: Initial training was disappointing and our object detector was not better than the one in-built into OpenCV. There were a lot suggestions by the team; may be we need more positive examples, may be optimizing the ratio of positive and negative images would work; may be optimize the hyper parameters, data augmentation techniques etc.
iii) Optimizations: After few iterations of data-augmentation, smart approaches to collecting and creating negative data we were finally able to make models which were far superior that that of OpenCV. But, was our model better than 95%? Client had provided us a test-set of around 600 test images. Now was the time to test it.
iv) Euphoria: When we ran our test scripts for the first time, our Haar based detector was at 97% and LBP was at 94% accuracy. With a few more optimization of hyper-parameters our Haar Detector was more than 99% accurate and LBP was close to 96% accurate.
v) Delivery: Needless to say, the client manager didn’t believe us the first time when we told him the numbers. However, they ran the tests on their another test-set to replicate the same kind of numbers to be overjoyed.
Steps/code to train your own object detector based on HAAR in OpenCV:
Assuming you have Python, perl and OpenCV installed on your linux machine and have collected all positive data in positive_images folder and negative data in negative_images folder. We have packaged the utilities, scripts and deployment code in a package to create a quick training module. You can download this package on our site(link below).
a.) Training data: You need to create text files postives.txt & negatives.txt like this:
find
|
1 2 |
./negative_images -iname |
“*.jpg”
|
1 2 |
> negatives.txt |
find
|
1 2 |
./positive_images -iname |
“*.jpg”
|
1 2 |
> positives.txt |
b.) Create samples:
i) Use createsamples.pl script to create .vec file for each image:
|
1 2 |
perl bin/createsamples.pl positives.txt negatives.txt samples 5000 |
“opencv_createsamples -bgcolor 0 -bgthresh 0 -maxxangle 1.1 -maxyangle 1.1 maxzangle 0.5 -maxidev 40 -w 40 -h 40”
ii) Use mergevec.py to merge .vec files into samples.vec like this:
|
1 2 |
python . |
/tools/mergevec.py -v samples/
|
1 2 |
-o samples.vec |
Output is samples.vec file.
c.) Training: You can train either Haar or LBP model. I am just covering LBP training. Haar can be trained similarly.
i) Local Binary Pattern(LBP) model:
LBP is much faster than HAAR but is less accurate. Train using following command(We trained on a machine with 64 GB RAM, reduce the values of precalcValBufSize and precalcIdxBufsize to 1024 if your machine hangs):
|
1 2 |
opencv_traincascade -data lbp -vec samples.vec -bg negatives.txt -numStages 20 -minHitRate 0.999 -maxFalseAlarmRate 0.5 -numPos 4000 -numNeg 7000 -w 40 -h 40 -mode ALL -precalcValBufSize 4096 -precalcIdxBufSize 4096 -featureType LBP |
Training may take anywhere between 2 to 24 hours. After which output files are created in the folder ‘lbp’. In this folder, cascade.xml is the model that is used for deployment.
Results:
- OpenCV prebuilt eye detector:

Vs
Eye detector trained by us:

If you want to build a state-of-the-art object detector or improve your existing object detector or need some consulting, you can reach me at koustubh@aimonk.com.
Acknowledgement:
- We used mergevec.cpp and createsamples.cpp scripts and released under the MIT licencse by Naotoshi Seo. Thank you.