The largest computer vision library OpenCV can now deploy Deep learning models from various frameworks such as Tensorflow, Caffe, Darknet, Torch. This tutorial is a step by step guide with code how I deployed YOLO-V2 model in OpenCV.
OpenCV: The open source computer vision library for everyone:
OpenCV has been the go-to library for computer vision for more than a decade. Released under BSD license, OpenCV code is free to be used for academic as well as commercial purposes. Millions of developers/academics/companies have been using OpenCV to build some really cool stuff.
Deep Learning changed computer vision forever:
However, the world of computer vision changed when deep learning arrived. For most of the computer vision tasks, deep learning models were built and trained which started outpacing the counter-part old machine learning methods implemented in OpenCV. So, accuracies got a shot in the arm. Time taken to build computer vision systems shrank to months from years(We didn’t need a complicated feature engineering process for each task). And all of this has happened too fast. Within a few years, deep learning has completely disrupted the computer vision. It has been all too exciting for a while, really hot and heavy. Even for some fundamental task like image classification, object detection etc. the state-of-the-art methods and accuracies were changing every few months. Let’s look at object detection:
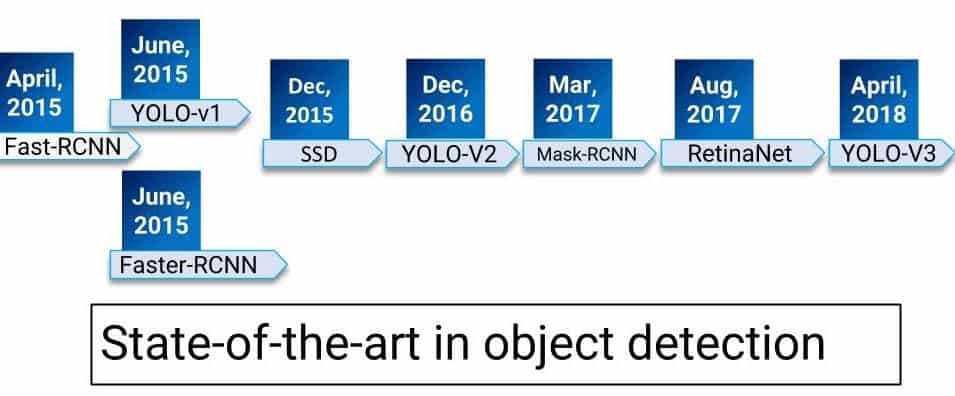
The Fast-Rcnn paper came out in April 2015 which used convolutional neural networks for generating object proposals in place of selective search and within a couple of months, we had Faster-RCNN which improved the speed and around the same time we had YOLO-v1 which didn’t look at object detection as a classification problem. In Dec 2015, we met single shot object detectors which were very impressive due to their speed and accuracy. After that YOLO-v2, Mask-RCNN, Retinanet(focal loss), YOLO-v3 all of them have pushed the limit of previous methods either in terms of accuracy or speed. The same excitement(chaos?) has been happening in most of the tasks in computer vision.
A New Power Is Rising:
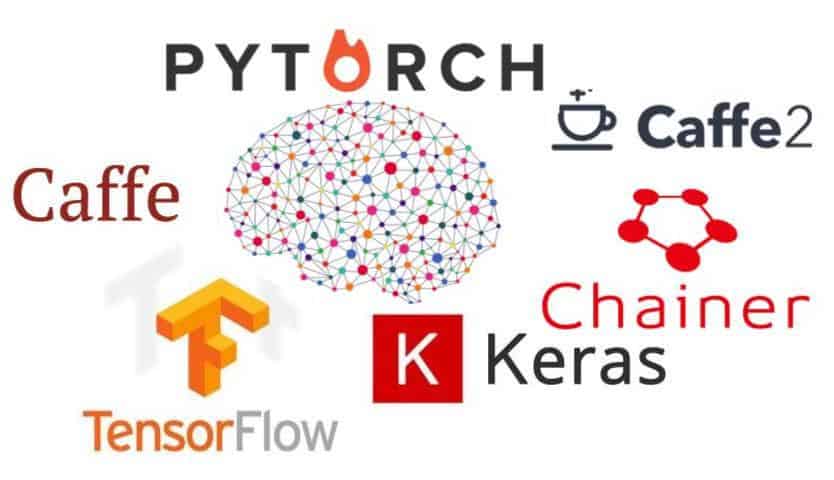
For deep learning a lot of deep learning libraries have emerged as winners which provide a lot of support and convenience to train deep learning models for visual recognition and other visual tasks. Tensorflow, Pytorch, Caffe, MxNet, CNTK, Keras etc. are the libraries we are using to build deep learning models.
These libraries and many more have implemented a lot of computer vision algorithm.
Deep Learning in OpenCV:
OpenCV decided to watch from the sidelines while the war was going on. Once, the skies are a little bit clear, OpenCV has introduced the flexibility of deploying deep learning models trained on other frameworks in OpenCV. Currently, it supports Caffe, Torch, Tensorflow, and Darknet. This is especially useful if you have deployed OpenCV based model say Hog+SVM classifier or Haar cascade based detector etc. in production and you want to replace it with a more accurate appropriate deep learning based model. So, you can train your models in your favorite deep learning library and deploy that model in your production infrastructure without disrupting your current workflow. In this series of tutorials, we shall learn how we can deploy models trained in other frameworks to openCV. Particularly in this one, we shall learn:
- How to deploy a darknet based object detection model in OpenCV. We shall be deploying Yolov2 and running it on a few images and videos.
- In part-2, we shall deploy a Sqeezenet model to openCV to generate predictions.
- In part-3, we shall deploy a Tensorflow model in OpenCV.
Deploying YOLO-V2 model in OpenCV:
In this section, we shall deploy the YOLO-v2 model for object detection which is trained on mscoco detection dataset which has 80 classes. These weights have been trained in darknet which is an open sourced neural network framework written in C. But, we don’t need to worry about darknet. All of this has been handled by OpenCV for us. We shall use the cv2.dnn.readNetFromDarknet() method to load the saved weights into the network.
|
1 2 3 4 |
model = 'yolov2.weights' config = 'yolov2.cfg' net = cv.dnn.readNetFromDarknet(config, model) |
This little command will give us the network architecture as specified in config loaded with the trained weights of yolov2.
blobFromImage method:
Now the next step is to load images in a batch and run them through the network. For this, we use the cv2.dnn.blobFromImage method. This method creates 4-dimensional blob from input images. Let’s look at the signature of this method:
blob = cv.dnn.blobFromImage(image, scalefactor, size, mean, swapRB, crop)
Where:
image: is the input image that we want to send to the neural network for inference.
scalefactor: If we want to scale our images by multiplying them by a constant number. A lot of times we divide all of our uint8 images by 255, this way all the pixels are between 0 and 1(0/255-255/255). The default value is 1.0 which means no scaling.
size: The spatial size of the output image. It will be equal to the input size required for the follow-on neural networks as the output of blobFromImage.
swapRB: Boolean to indicate if we want to swap the first and last channel in 3 channel image. OpenCV assumes that images are in BGR format by default but if we want to swap this order to RGB, we can set this flag to True which is also the default.
mean: In order to handle intensity variations and normalization, sometimes we calculate the average pixel value on the training dataset and subtract it from each image during training. If we are doing mean subtraction during training, then we must apply it during inference. This mean will be a tuple corresponding to R, G, B channels. For example mean values on the imagenet dataset is R=103.93, G=116.77, and B=123.68. If we use swapRB=False, then this order will be (B, G, R).
crop: Boolean flag to indicate if we want to center crop our images. If it’s set to True, the input image is cropped from the center in such a way that smaller dimension is equal to the corresponding dimension in size and other dimension is equal or larger. However, if we set it to False, it would preserve the aspect ratio and just resize to dimensions in size.
YOLO-V2 model needs input images in the size of (416,416) and scales the images by dividing them by 255. So, here is how we use it:
blob = cv.dnn.blobFromImage(frame, 1.0/255.0, (416, 416), True, crop=False)
Finally, we get the output predictions and draw them on the input image.
|
1 2 3 4 5 6 7 8 9 10 11 12 13 14 15 16 17 18 19 20 21 22 |
net.setInput(blob) # Run the preprocessed input blog through the network predictions = net.forward() probability_index=5 for i in range(predictions.shape[0]): prob_arr=predictions[i][probability_index:] confidence=np.amax(prob_arr) if confidence > min_confidence: x_center=predictions[i][0]*width y_center=predictions[i][1]*height width_box=predictions[i][2]*width height_box=predictions[i][3]*height x1=int(x_center-width_box * 0.5) y1=int(y_center-height_box * 0.5) x2=int(x_center+width_box * 0.5) y2=int(y_center+height_box * 0.5) cv.rectangle(frame,(x1,y1),(x2,y2),(0,255,0),1) cv.imshow(winName, frame) |
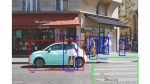
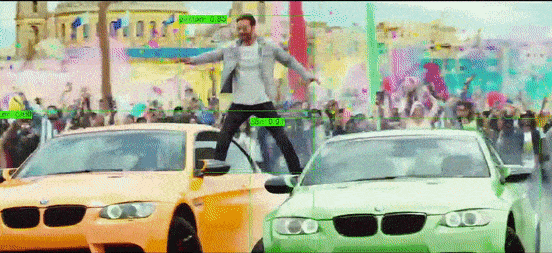
The output seems pretty good.
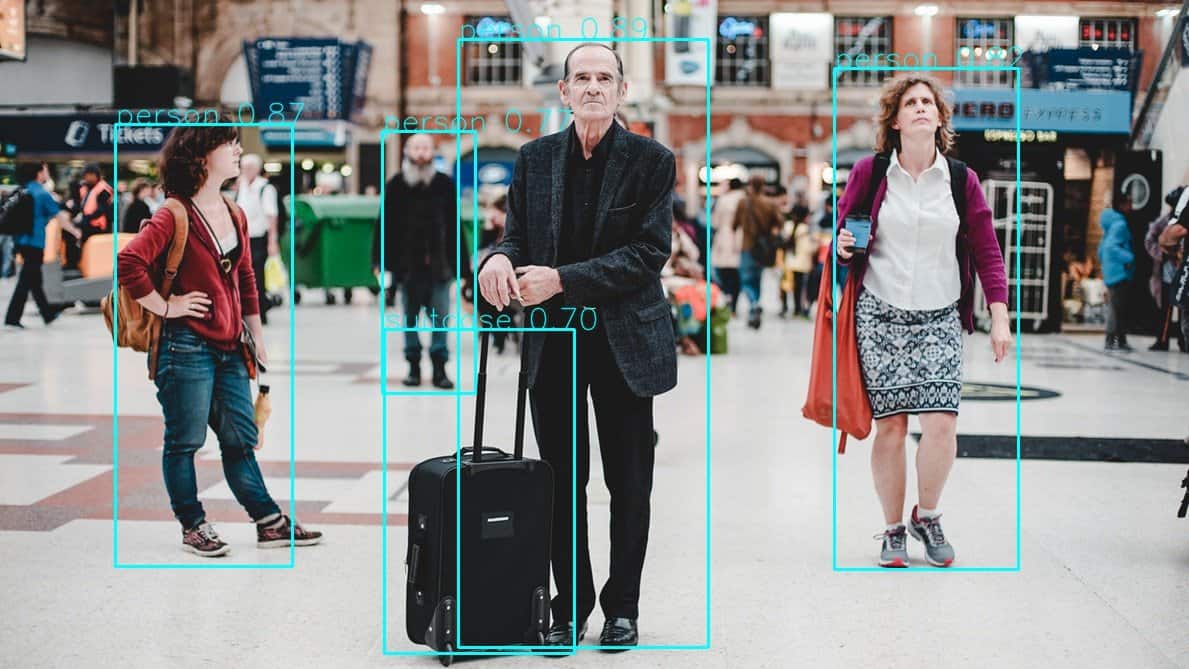
Running YOLO object detection in OpenCV
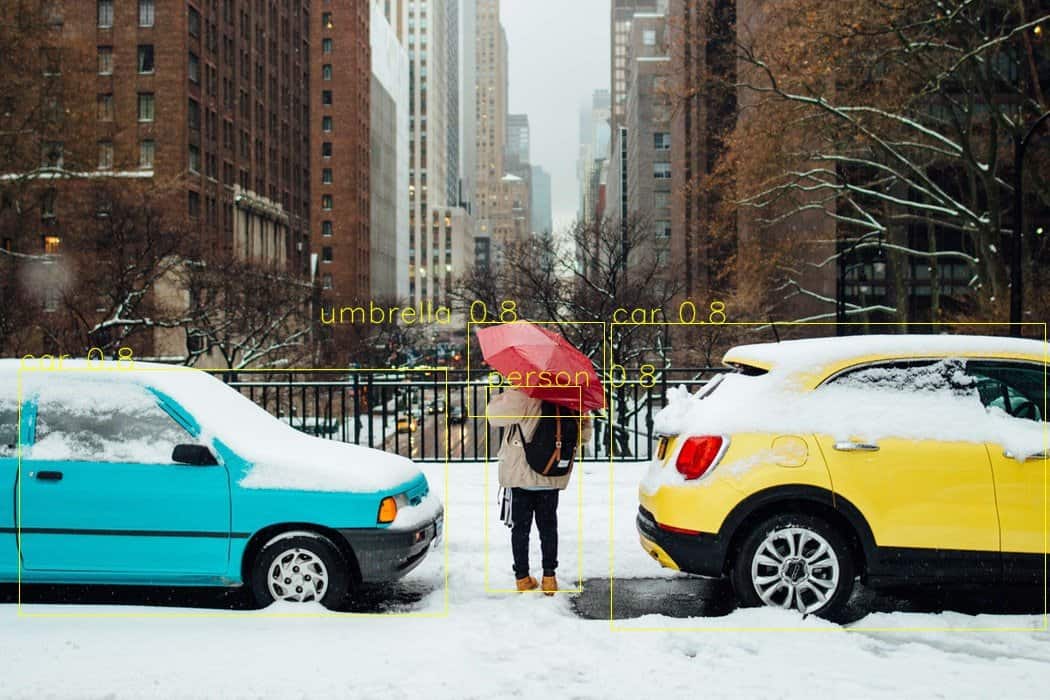
Here is another example:
And why not ran the same on a video to create a GIF.
The code for this post can be found here in our code repository on github.